DIY: Air Dry Clay Dough Mobile
This week I had the pleasure of collaborating with artist Kim Baise. Baise is the queen of papier-mâché, creating whimsical sculptures, mobiles, and jewelry. We were lucky to have her lead one of her workshops in our studio in March of 2019. Our collaboration took a different medium in the form of air dry clay. We went back and forth in our messages and I went to work in the kitchen, experimenting with three different recipes before landing on one tried and true.
I took careful consideration of the materials for this clay, specifically addressing food scarcity, readiness of a variety of supplies, and ease of use for parents and kids alike. What I ended up with was using two food ingredients in the smallest quantity needed (and it could be further reduced) and water.
For the purposes of this demonstration, I used 1/2 cup flour (and gluten-free flour will work, as well), 1/4 cup kosher salt (table salt will work fine), and approx. 1/4 cup tap water (give or take a bit). You will also need a small mixing bowl and a spoon to stir.
Here is a time lapse video of the mixing and shaping of the dough. I sprinkled in more flour and kneaded until it wasn’t too sticky to handle.
*I apologize in advance for my pencil (didn’t notice that one until after uploading the film). It sure seems appropriate during these Covid-19 days.
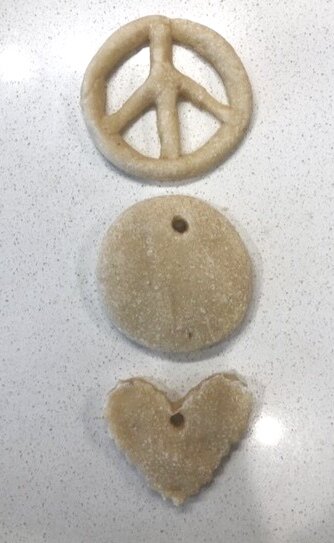
Once the dough is formed into shapes you like, use a chopstick or other pointy tool to pierce holes at the top AND BOTTOM of each shape to string them together later. I neglected to pierce the bottom of the heart and smiley face and realized when I went to string them together that the holes were missing. Thankfully I was able to pierce the dough with a sharp tool.
You now have two options for drying your clay dough. One is to let it air dry overnight. The other is to bake at 200* and the length of baking time will vary depending on the thickness of your pieces. I recommend starting at 10 minutes and flipping over. I placed my pieces to dry on aluminum foil but parchment paper could work, as well.
I wouldn’t recommend letting them dry on a surface you can’t peel away from the back of the pieces...so no plates or sheet pans that aren’t covered.
Don’t forget to pierce holes in the top and bottom of the shapes that will hang in the middle of the mobile (see finished pic at top). And make note of the size of the string you’ll be using to hang them to determine the size of the holes.
Once your pieces are dry, you can paint them. I used acrylic paints and a paper plate as a palette, squeezing out very small amounts of paint. Poster paint or tempera paints would work well, too. For my paint station I have a small rag to dry my brush and a cup of water to wash it, along with a few different brushes including one very small one for details.
In total I made four shapes: a peace sign, a rainbow, a heart, and a smiley face.
Once all shapes are dry (and they do dry quickly), you may string them together. Embroidery floss is a great option, and if you spend a little time making braided strands, they would work really nicely with the overall effect of this particular mobile.
For my example I used one continuous strand of embroidery floss, starting at the bottom and threading back to front until I reached the top shape. Then I reversed direction and doubled, going down from top to bottom and tying behind the rainbow. There are probably many ways to string them together.
Other options are yarn, string, or even dental floss. One thing I’ve been trying to emphasize amid our quarantine days is that we have to make do with what we have and embrace the beautiful imperfections.
I’d love to see what you come up with! You can share any of your clay dough creations on our Facebook page or tag us on Instagram @thearterieartstudio.
Be well. Sending much gratitude for your continued support, along with all the virtual hugging I can do!


